The Importance of Splicing rather than using a Landlubbers Knot
Knots lower the strength of all ropes by at least 50%. This is because knots have a very high centre of curvature when the rope wraps around the same rope in a knot.
However, different braided ropes made out of different materials should use the most appropriate splice for the application.
Polyester and Nylon double braids should be spliced using a standard Polyester splice where the outer cover is fed back down the braided centre.
This is not acceptable for UHMWPE, Dyneema® fibre, Spectra and Vectran ropes or ropes that have a centre that carries most of the total load. (See splicing instruction.)
Single braids in all materials are best to use a Brummel splice where the tail and main rope are interlinked through each other to make a simple high strength splice. The tail is then tucked into the centre to finish the splice.
Nautilus Braids has the ability to carry out machine splicing when the rope is being made. This can only be done at one end. However, a machine splice is particularly effective as both the centre and the outer can be fed back down the centre of the rope and tapered to make a superior splice.
The Importance of Splicing – especially for braids made with UHMWPE Fibre
Nautilus Braids has installed a high spec strength tester for testing ropes up to 14 tonnes. There has been much knowledge gained as we can liberally test all our ropes. Much of this information we already know but the refinement gained has been great and we feel some of this should be shared with our customers because of the immense importance.
1. UHMWPE (Ultra High Molecular Weight Polyethylene) ropes get stronger as they are used up to a point (after some years of use) where they start to deteriorate. Typically, on an 8mm winch rope, the increase in strength with use may be as high as 800kg.
2. In the test standards, there are different tests – a cyclic test and a straight break test. Most braiding companies quote the cyclic test as their claimed strength.
3. Always use splicing for UHMWPE ropes. For single braids, it is best to use a Brummel splice with a long tapered tail (at least 400mm long is necessary). For double braids, it is best use a double braid UHMWPE eye splice.
4. While it is not so important due to the small amount of fibre stretch, polyester braids should also be spliced rather than knotted.
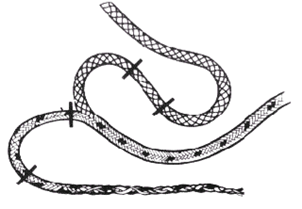
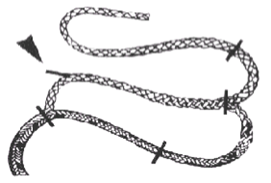
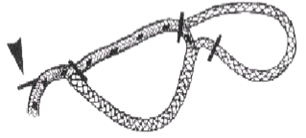
5. The tight bends in the rope when knotted create pressure points where the braid will fail. See the four different splicing techniques we recommend below:
1) Brummel Eye Splice
2) Non–stretch Core Double Braid Eye Splice
3) 100% Polyester or Nylon Double Braid Eye Splice
4) Multiplait Splice
The graph below illustrates the difference in strength of a non-stretch test sample with and without a knot tied in the rope.

Brummel Eye Splice – for Single Braids
1. Pull end hard to roll “inside-out” at Mark A.
2. Now pass end through centre of rope at Mark B (in same direction as before).
3. Pull A all the way through and pull tight.
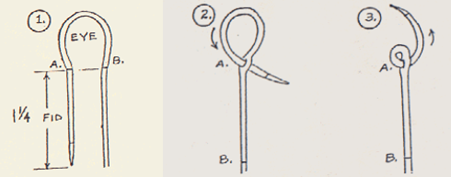
4. You now have points A&B rolled inside-out.
5. No un-roll point A working rope up and through point A in direction shown.
6. Pull point B all the way through A.
7. Now un-roll Point B working short end up & through Point B in direction shown.
8. Pull short end up – while pulling the standing end down as shown.
9. Continue to close-up locked Brummell Splice.
10. Finally, bury tail into standing end.
A lock splice may also be used if desired.
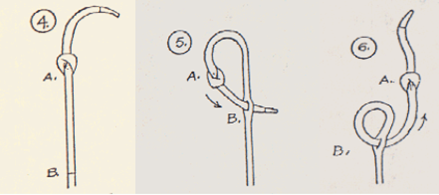
Dyneema or Spectra Core Double Braid Eye Splicing Instructions
There is another splice for 100% polyester double braids.
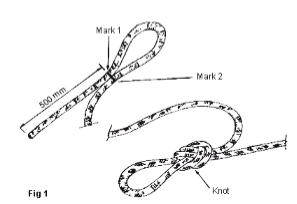
Step 1 (Fig 1)
1. Tie a knot 2 metres (7 ft) from the end to be spliced to stop the core slipping back up the rope.
2. Mark the rope 500mm (20″) from the end (Mark 1).
3. Form the loop to desired size and mark the other side of the loop (Mark 2) opposite Mark 1.
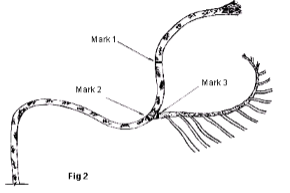
Step 2 (Fig 2)
4. Extract the core at Mark 2.
5. Mark the core where it exits the cover as Mark 3.
6. Taper the core by pulling out strands evenly throughout the core tail length and trim off flush.
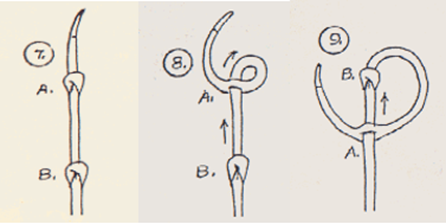
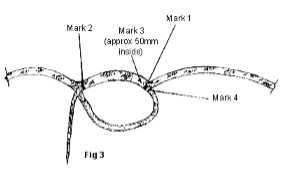
Step 3 (Fig 3)
7. Fid the core.
8. Feed the core into the cover at Mark 1 exiting at Mark 2. Feed in sufficient for Mark 3 to be approx. 50mm (2″) inside the cover at Mark 1.
9. Mark core where it meets Mark 1 (call this Mark 4).
10. Smooth the loop cover on the formed loop over the core.
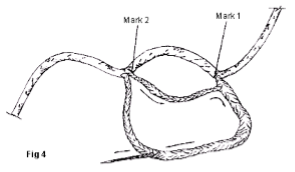
Step 4 (Fig 4)
11. Feed the core with fid into the core at Mark 4 and feed completely down the centre of the main core. NB: You will need to take additional core out of the cover from beyond Mark 2 to allow feeding.
12. Pull the fid down inside the main core until Mark 1, 2 & 4 all meet.
13. Remove the fid from main core and tapered core.
14. Milk the main cover back up over the double core until all the core disappears into the core.
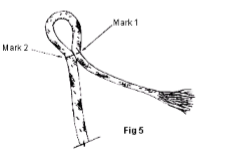
Step 5 (Fig 5)
15. You have now formed the loop with an empty cover hanging out as shown.
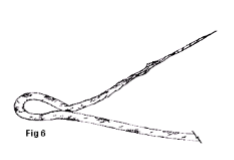
Step 6 (Fig 6)
16. Taper the empty cover as done to the core in Step 2 and fid the end.
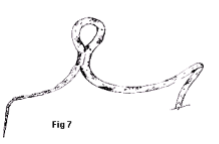
Step 7 (Fig 7)
17. With the fid take the empty cover down between the cover and core for about 25mm (1″) and exit.
Step 8 (Fig 8)
18. Trim the excess of empty cover with a hot knife in line with the braid, taking care not to damage the main cover.
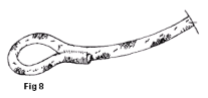
The splice is now complete.
Racing Braid Eye Splicing Instructions
Note: Use only on 100% Polyester Yacht Racing Braid or 100% Nylon Double Braids. There is another splice for UHMWPE fibre such as Dyneema or Spectra core double braids.
Step 1 (Fig 1)
1. There are two marks to be made on the cover of the rope. Make the first mark approximately 25 diameters from the end of the rope (or 1.5 times the length of the rope in the eye, whichever is longest).
2. The loop is then formed to required size and the second mark made opposite Mark 1. This is the crossover point.
3. A knot is tied about 1.5 metres back up the rope to stop the core slipping.
Step 2 (Fig 2)
4. The core is extracted at the crossover point by bending the rope and hooking the core out with a spike. The core should be marked at this point (Mark A) and then pulled out another 5 rope diameters and marked again (Mark B).
5. The cover end is also tapered, starting about 50 mm or one colour coding towards the end from the first mark.
6. Alternate strands are then cut and the end of the cover taped.
Step 3 (Fig 3)
7. The taped end of the cover is taped to a fid and pushed into the core, entering at Mark B and pushed until the first mark on the cover (Mark 1) reaches the entry point.
8. The fid is taken out of the core.
Step 4 (Fig 4)
9. The end of the core is now taped to a fid and entered into the hollow part of the cover at Mark 1 and pulled out at the crossover point or second mark on the cover.
Step 5 (Fig 5)
10. When the core and cover parts that form the loop have been “milked” level, the excess core left protruding at the crossover is then cut off flush with the cover. The cover is then “milked” from the 1 .5 metre knot back towards the loop.
11. The core should now disappear into the cover.
Step 6 (Fig 6)
The finished splice!
Multiplait 8-Strand (Square Braid) Splicing
To splice a rope to a chain (Multiplait and 3-strand) have a look at the following article: http://www.johndanicic.com/sailing%20pages/GOB%20articles/JF07_Splicing.pdf
The “Back splice for square line” is effectively a very small Multiplait eye splice around the last link of chain.
Eye Splicing Instructions:
1. Measure 12 x the diameter of the rope from the end and tie twine tightly around it.
2. Unravel the end of the Multiplait rope until you reach the twine marker. Do not simply cut off the end of the rope, as the sealed ends will stop the strands from fraying later on when the rope is in use again.
3. Examine the eight strands of the rope that you have just unravelled. Four strands of rope will twist clockwise. Take those four and separate them into pairs. Hold one pair together and wrap the first colour tape (for example blue tape) around the tip of the pair. Wrap more blue tape around the second pair.
4. Gather the remaining four strands, which should twist counter clockwise. Separate them into pairs and wrap the second colour tape, for example yellow tape, around the tip of the first pair, then the second pair. You should have four pairs of strands wrapped in four pieces of tape.
5. Form the eye of the splice by twisting the rope and making a loop with it, laying out the pairs of strands so that the pairs alternate colours – blue, then yellow, then blue, then yellow – and lay spread out to the left of the loop. Insert the Swedish fid into the plaited rope right below the loop.
6. Pick up the blue pair of strands closest to the top of the loop and tuck it under the yellow pair that is closest to it. Then, pick up the yellow pair of strands farthest from the top of the loop and tuck it under the blue pair that is closes to it. Pull the weaving tight.
7. Flip the rope over so that the strands are spread out on the right side of the rope. Tuck the yellow pair of strands that is closest to the top of the loop under the blue pair beneath it. Tuck the blue pair of strands that is closest to the bottom of the loop under the yellow pair right below it and tighten. The strands should be split, with a yellow and blue pair on either side of the loop.
8. Locate the rope that is still intact beneath the loop and wedge the Swedish fid into one of the plaits there. Weave the pair of strands on the top right of the rope underneath the gap that the Swedish fid is creating. Remove the fid and move it down to the next strand, creating a gap by wedging it in. Tuck the first pair on the top left under the gap and tighten. Continue to move the fid down the rope and tuck the bottom right pair and then the bottom left pair into the gaps and tighten. Do so, splicing the braid until the entire length of the strands is woven into the rope.
9. Add dabs of super glue to the places in the rope where the spliced strands end and join with the rope. This will further prevent your splicing job from becoming undone or fraying.